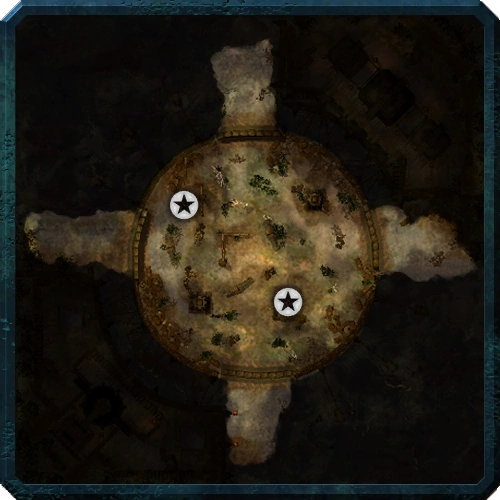
The Bloodied Colosseum is the original The Last Stand map, introduced in the original Dawn of War II version and included in the new Dawn of War II: Retribution & The Last Standalone version as well. This article lists the enemy spawns for all waves and suggests strategies to beat them.
Map description[]
This map is more open than The Anvil of Khorne, which allows kiting enemies around the map and makes mobility even more important. There are two buildings on the arena, offering protection from early-game mobs, but these get easily destroyed during later waves, instantly killing any heroes within. The western spawn area has a glitch that allows players to "ride" up above the map by standing on the door structure as it closes, opening a glitched "upper level" where heroes can run around in relative safety.
The initial waves are much easier than on Anvil, but the final waves, especially 16 and 20, are actually harder. Waves 4, 8 and 12 have tougher "boss" enemies (Force Commander, Zoanthropes, WraithLords), wave 16 has the team fighting their own clones, waves 17 to 19 have even tougher super bosses supported by vehicles (Carnifexes, Deff Dreds, Dreadnoughts), and wave 20 is the ultimate challenge with an end boss, the bosses from waves 17 to 19, and the clones from wave 16.
Clearing waves on Colosseum takes quite a bit of time, making it worse than Anvil of Khorne for XP grinding even if the maximum XP gain is slightly higher.
The map has four spawn points for enemies, labeled 1–4 in the tables below. The locations will be randomized for each game, but the enemy unit compositions and spawn timings will apply.
XP rewards[]
Experience points are awarded for clearing each wave according to the table below. The round must be finished (either by all players dying or by clearing wave 20) before XP is awarded.
| Wave | Reward | Accum. | Wave | Reward | Accum. |
|---|---|---|---|---|---|
| 1 | 100 | 100 | 11 | 200 | 1,850 |
| 2 | 100 | 200 | 12 | 400 | 2,250 |
| 3 | 100 | 300 | 13 | 250 | 2,500 |
| 4 | 200 | 500 | 14 | 250 | 2,750 |
| 5 | 150 | 650 | 15 | 250 | 3,000 |
| 6 | 150 | 800 | 16 | 600 | 3,600 |
| 7 | 150 | 950 | 17 | 300 | 3,900 |
| 8 | 300 | 1,250 | 18 | 300 | 4,200 |
| 9 | 200 | 1,450 | 19 | 300 | 4,500 |
| 10 | 200 | 1,650 | 20 | 600 | 5,100 |
Wave 1: Orks[]
| Time | Spawn | Unit |
|---|---|---|
| 0 | 1 | Shoota Boyz (2) |
| 0 | 2 | Shoota Boyz (2) |
It's really very hard to get yourself killed during this wave – if you manage to die, it's actually kind of impressive as you must have a low-level hero doing something really stupid while the rest of the team watches by. There's only two pitiful mobs of Boyz that a single hero can beat. Split up to clear this wave faster.
Wave 2: Tyranids[]
| Time | Spawn | Unit |
|---|---|---|
| 5 | 1 | Hormagaunts (2) |
| 10 | 1 | Termagants (1) |
| 10 | 4 | Termagants (1) |
| 10 | 3 | Hormagaunts (2) |
This is not much different from wave 1. This is the first wave with melee enemies (Hormagaunts) that can kill a low-level ranged hero. Split your team to mop up faster.
Wave 3: Eldar[]
| Time | Spawn | Unit |
|---|---|---|
| 0 | 3 | Guardians (2) |
| 5 | 2 | Guardians (2) |
| 10 | 1 | Guardians (1) |
| 10 | 4 | Guardians (1) |
This is largely like wave 1, but this time they're space elves and there's more of them. Split to speed things up.
Wave 4: Space Marines[]

| Time | Spawn | Unit |
|---|---|---|
| 0 | 2 | Imperial Guardsmen (2) |
| 0 | 3 | Imperial Guardsmen (2) |
| 0 | 4 | Imperial Guardsmen (2) |
| 10 | 1 | Force Commander (1) |
| 10 | 1 | Apothecary (2) |
This is the first "boss wave", meaning it has hero-level enemies to spice things up. The initial Guardsmen are very squishy, but the Force Commander is a tough melee opponent and the two Apothecary heroes have a healing ability. Still, it's nothing a little focused fire can't solve. Kill the Guardsmen quickly and then concentrate on the heroes one at a time. Kill the Apothecaries first, as they are weaker but keep healing the Force Commander and each other.
The Force Commander is definitely not a good target for a Sorcerer's Doppleganger.He is too slow and wont hit often. Warrior of wave 5 are by far much better.
Wave 5: Tyranids[]
| Time | Spawn | Unit |
|---|---|---|
| 0 | 2 | Termagants (2) |
| 0 | 3 | Termagants (2) |
| 5 | 1 | Warriors (1) |
| 5 | 4 | Warriors (1) |
The first wave with Warriors, melee Tyranids considerably tougher than Hormagaunts that have a knockback leap ability. Warriors can be dangerous to squishy ranged heroes. After leaping, the whole brood will be standing in a very small area, vulnerable to attacks with even minimal AoE.
Wave 6: Orks[]
| Time | Spawn | Unit |
|---|---|---|
| 0 | 2 | Shoota Boyz (3) |
| 0 | 3 | Shoota Boyz (3) |
| 5 | 1 | Ork Nobz (1) |
| 5 | 4 | Ork Nobz (1) |
| 15 | 1 | Stikkbombaz (1) |
| 15 | 2 | Stikkbombaz (2) |
This is the first wave with Nobz (heavy melee Orks) and Stikkbombaz (melee/grenade guys). Keep an eye on the grenades and move when you have them at your feet. Focus fire on the Nobz to take them down.
Wave 7: Eldar[]

| Time | Spawn | Unit |
|---|---|---|
| 0 | 1 | Shuriken Cannon (1) |
| 0 | 3 | Shuriken Cannon (1) |
| 0 | 1 | Banshees (1) |
| 0 | 2 | Banshees (2) |
| 0 | 3 | Banshees (1) |
| 5 | 2 | Warp Spiders (1) |
| 5 | 4 | Warp Spiders (1) |
You will probably learn to hate Shuriken Cannon spam later on. Luckily, there's only two here. Flank them – a teleport/jump ability is easiest – to avoid suppression and subsequent death. Warp Spiders have high damage, but there is only two squads. Banshees are the main threat; they are fast, plenty, and can leap long distances to attack you. This can be fatal to weak heroes without mobility abilities.
Wave 8: Tyranids[]
| Time | Location | Unit |
|---|---|---|
| 0 | 2 | Termagants × 2 |
| 0 | 3 | Termagants × 2 |
| 5 | 1 | Warriors × 1 |
| 5 | 3 | Warriors × 1 |
| 5 | 1 | Zoanthrope × 1 |
| 5 | 2 | Zoanthrope × 1 |
| 5 | 3 | Zoanthrope × 1 |
| 5 | 1 | Hormagaunts × 1 |
| 5 | 2 | Hormagaunts × 1 |
| 5 | 3 | Hormagaunts × 1 |
| 5 | 4 | Hormagaunts × 1 |
Suggestion: The second "boss wave", this time with Zoanthropes (artillery Tyranids with AoE and knockdown) and melee-centric fodder. Withdraw to one of the spawn locations instead of standing in the arena and being shot at by all of the Zoanthropes.
Wave 9: Eldar[]

| Time | Location | Unit |
|---|---|---|
| 0 | 3 | Banshees × 3 |
| 0 | 1 | Shuriken Cannon × 1 |
| 0 | 2 | Shuriken Cannon × 1 |
| 0 | 2 | Warp Spiders × 1 |
| 5 | 3 | Shuriken Cannon × 1 |
| 5 | 4 | Shuriken Cannon × 1 |
| 5 | 1 | Warp Spiders × 1 |
| 20 | 3 | Banshees × 6 |
| 20 | 1 | Shuriken Cannon × 1 |
| 20 | 4 | Shuriken Cannon × 1 |
Suggestion: There are large banshee blobs but AoE is very effective in dealing with them. Shuriken cannons should be prioritized if not in immediate danger.
Wave 10: Space Marines[]
| Time | Location | Unit |
|---|---|---|
| 0 | 1 | Tactical Marines × 2 |
| 5 | 2 | Tactical Marines × 2 |
| 10 | 3 | Tactical Marines × 2 |
| 15 | 4 | Tactical Marines × 4 |
| 15 | 2 | Scout Marines × 3 |
| 15 | 3 | Scout Marines × 3 |
Suggestion: Tactical marines carry plasma guns that deal very high ranged damage but lack of accuracy while Scouts have rapid fire bolters and move faster (this usually makes them the main threat), but since they are more vulnerable than Space Marines is highly recommended to eliminate them first. It is advisable to use cover whenever possible, or try to attack them while they are distracted with someone else. Scouts are infiltrated at the start and will throw grenades.
Wave 11: Orks[]
| Time | Location | Unit |
|---|---|---|
| 0 | 1 | 'Uge Hamma Nob × 1 |
| 0 | 3 | 'Uge Hamma Nob × 1 |
| 0 | 1 | Stronga Shoota Boyz × 2 |
| 0 | 3 | Stronga Shoota Boyz × 2 |
| 10 | 2 | Stormboyz × 2 |
| 10 | 4 | Stormboyz × 2 |
| 15 | 1 | 'Uge Choppa Nob × 1 |
| 15 | 3 | 'Uge Choppa Nob × 1 |
| 15 | 2 | Stronga Shoota Boyz × 2 |
| 15 | 4 | Stronga Shoota Boyz × 2 |
| 15 | 2 | Stormboyz × 1 |
| 15 | 4 | Stormboyz × 1 |
While this wave has few units that are individually powerful, there are a lot of units and you could easily find yourself surrounded and chopped down if you stand in the one spot for too long since Stormboyz knockback when they land, negating you the possibility to move or attack.
Wave 12: Eldar[]
| Time | Location | Unit |
|---|---|---|
| 0 | 1 | Guardians × 2 |
| 0 | 2 | Guardians × 2 |
| 0 | 3 | Warp Spiders × 2 |
| 0 | 4 | Banshees × 2 |
| 5 | 1 | Shuriken Cannon × 2 |
| 10 | 1 | Wraithlord × 1 |
| 15 | 1 | Guardians × 1 |
| 15 | 2 | Shuriken Cannon × 2 |
| 20 | 2 | Wraithlord × 1 |
| 20 | 3 | Wraithlord × 1 |
| 20 | 4 | Wraithlord × 1 |
| 25 | 2 | Warp Spiders × 1 |
| 25 | 3 | Warp Spiders × 1 |
| 25 | 4 | Warp Spiders × 1 |
| 30 | 1 | Guardians × 1 |
As if Banshees weren't powerful enough, now you've got to handle four wraithlords and a whole heap of shuriken fire as well. Luckily wraithlords are fairly slow so you should be avoid them for a short while, hopefully long enough to have you team focus fire them down.
Wave 13: Orks[]
| Time | Spawn | Unit |
|---|---|---|
| 0 | 3 | Ork Nobz (1) |
| 0 | 1 | Stronga Shoota Boyz (2) |
| 0 | 2 | Stronga Shoota Boyz (2) |
| 0 | 3 | Stronga Shoota Boyz (2) |
| 0 | 4 | Stronga Shoota Boyz (2) |
| 10 | 1 | 'Uge Choppa Nob (2) |
| 10 | 3 | 'Uge Choppa Nob (1) |
| 10 | 4 | Rokkit Launchaz (2) |
| 15 | 3 | 'Uge Choppa Nob (1) |
| 25 | 2 | Rokkit Launchaz (2) |
| 25 | 4 | Stronga Shoota Boyz (1) |
This wave features chain knockback from all the rokkits and stikkbombs. Heroes without the Unshakable trait should be extra careful because of this, otherwise it's a rather straightforward run.
Wave 14: Tyranids[]
| Time | Location | Unit |
|---|---|---|
| 0 | 2 | Termagants × 3 |
| 0 | 3 | Termagants × 3 |
| 5 | 3 | Termagants × 1 |
| 5 | 1 | Warriors × 1 |
| 5 | 3 | Warriors × 1 |
| 10 | 1 | Raveners × 1 |
| 10 | 2 | Raveners × 1 |
| 10 | 3 | Raveners × 1 |
| 10 | 4 | Raveners × 1 |
| 20 | 1 | Hormagaunts × 1 |
| 20 | 2 | Hormagaunts × 1 |
| 20 | 3 | Hormagaunts × 1 |
| 20 | 4 | Hormagaunts × 1 |
Raveners (good choice for doppelganger Sorceror) focus fireing are a real threat on this wave. A tank can try to distract, but best bets tend to involves camping in cover. Be careful of warriors swarming your position though. If you can spread out and avoid taking on all the units at once then you should be fine.
Wave 15: Orks[]
| Time | Location | Unit |
|---|---|---|
| 0 | 1 | Stikkbombaz × 2 |
| 0 | 2 | Stikkbombaz × 2 |
| 10 | 3 | Stikkbombaz × 2 |
| 10 | 4 | Stikkbombaz × 2 |
| 10 | 1 | Rokkit Launchaz × 1 |
| 10 | 2 | Rokkit Launchaz × 1 |
| 10 | 3 | Stronga Shoota Boyz × 2 |
| 10 | 4 | Stronga Shoota Boyz × 3 |
| 20 | 3 | Rokkit Launchaz × 2 |
| 20 | 4 | Rokkit Launchaz × 2 |
| 35 | 1 | 'Uge Choppa Nob × 2 |
| 35 | 2 | 'Uge Choppa Nob × 2 |
| 45 | 3 | 'Uge Choppa Nob × 2 |
| 45 | 4 | 'Uge Choppa Nob × 2 |
Lots and lots of knock down on this wave with a large nob rush at the end. As with wave 13 heroes without unshakable need to be careful. When the initial rush of stickbombs and rokkits are over, don't rest just yet, watch for nob mobs and kite if possible, avoid any one hero getting corned by more than 1 nob and it should just be mop up.
Wave 16: Special[]
| Time | Location | Unit |
|---|---|---|
| 0 | 3 | Player 1 clone |
| 0 | 3 | Player 2 clone |
| 0 | 3 | Player 3 clone |
Notes: Even if a player has dropped out previously, their hero will be cloned in wave 16. If a player has doppelgängers or minions, they will be cloned along with the heroes.
Suggestion: Wave 16 is the fourth "boss wave", but this time you will face clones of all three heroes on your team. The clones have all your original abilities and will revive each other if incapacitated. This can be especially inconvenient if your heroes have insta-revive wargear equipped.
Generally, it is best to kill the weaker members first as the stronger members will tend to try and revive them, thus giving you extra time to weaken them. It also saves you from having to fight the toughest member of the party over and over.
If there is a doppelganger Sorceror on your team, you should let the weakest member of you party go out first so that the clone Sorceror will create a weak doppelganger. The real Sorceror should then clone the strongest clone.
An alternative to this is to note the position that the banshees spawn from on wave 9 and plant 4-6 (depending on your comfort range) 'Uge Bombz (lvl 18 ork) on top of one another at about the midpoint of the spawn area where the banshees came from. If you place them correctly you can detonate them all with a single click since their buttons will overlap. It is highly unlikely that any hero on your team will have enough hit points to survive this. However, take care to have your allies avoid that area at all costs as explosives from allies (e.g. rok strike) or enemies (e.g. stikbombz) can detonate them.
Tip for players with the Tau-Commander unlocked and on level 20: This tactic requires the wargear dronecontroller, which you get by killing your 3 doppelgängers in w16 within 5 seconds by yourself (hardest wargear in the game to get, by the way). Note the exact position where the banshees in w9 spawn. Equip a heavy armour or shield, so you can stun by jumping. Equip markerdrone and dronecontroller. At the beginning of wave 16, get ready for jumping right onto the spawn position. (note: this is hard and needs some skill. you might instantly die if you fail. the doppelgängers in w16 spawn very fast, so you have less than 2 seconds after the last nob of w15 has died. practise is the key of success.) After landing on them, you have a time window of ~3 seconds of stun, when your enemies can't do anything. Place your drone right on your clones, detonate it and jump away (it does friendly fire). This thing needs 2 seconds to detonate, but then it does some massive damage. It Should kill all Doppelgängers, apart from a full-tank Hive Tyrant and maybe a full-tank captain, as well as an eldar might use the invulnerability on herself. Apart from that, this is a great way to get w16 done without dying.
Wave 17: Tyranids[]
| Time | Location | Unit |
|---|---|---|
| 0 | 3 | Carnifex × 1 |
| 5 | 3 | Lictor Alpha × 1 |
| 5 | 2 | Hormagaunts × 3 |
| 5 | 1 | Hormagaunts × 2 |
| 5 | 4 | Hormagaunts × 2 |
| 10 | 2 | Warriors × 1 |
| 10 | 4 | Warriors × 1 |
| 15 | 1 | Termagants × 3 |
| 15 | 4 | Termagants × 1 |
| 15 | 4 | Hormagaunts × 1 |
| 25 | 3 | Carnifex × 1 |
| 25 | 2 | Carnifex × 1 |
| 25 | 3 | Termagants × 1 |
| 25 | 1 | Raveners × 2 |
| 25 | 4 | Raveners × 2 |
The first of the hero waves, a lictor and several carnifexs are the main threats along with a truck load of raveners at the end. Try to focus fire the lictor early on or risk having low health members of your team killed with frightening speed when the lictor decloaks behind them. After that kite the carnifex while you take down the raveners. Speed is of the essence with this wave, getting your heroes bogged done in melee with multiply gaunts and nixes while raveners shoot from a distance practically guarantees a party wipe.
Wave 18: Orks[]
| Time | Location | Unit |
|---|---|---|
| 0 | 2 | Stronga Shoota Boyz × 3 |
| 0 | 3 | Stronga Shoota Boyz × 4 |
| 0 | 2 | Warboss × 1 |
| 5 | 1 | Stronga Shoota Boyz × 2 |
| 5 | 1 | 'Uge Hamma Nob × 2 |
| 5 | 2 | 'Uge Hamma Nob × 2 |
| 5 | 1 | Deff Dread × 1 |
| 15 | 3 | 'Uge Choppa Nob × 2 |
| 15 | 4 | 'Uge Choppa Nob × 2 |
| 15 | 2 | Deff Dread × 1 |
| 15 | 2 | Rokkit Launchaz × 1 |
| 25 | 3 | Deff Dread × 2 |
| 25 | 3 | Rokkit Launchaz × 1 |
| 25 | 3 | Stronga Shoota Boyz × 1 |
| 35 | 4 | Deff Dread × 2 |
| 35 | 4 | Rokkit Launchaz × 1 |
| 35 | 4 | Stronga Shoota Boyz × 1 |
A very hard wave, the Warboss has huge melee damage, but is slow so can be kited. The same, sadly, does not hold true for the Deff dreads. A means of jumping or unshakable or preferably both is almost a requirement for this wave. Otherwise heroes tend to get knocked down and focused fired to death. A farseer can fulfill the teleportation role for the whole team easily.
Wave 19: Space Marines[]
| Time | Location | Unit |
|---|---|---|
| 0 | 2 | Terminator Marine × 1 |
| 0 | 1 | Scout Marines × 4 |
| 0 | 3 | Scout Marines × 4 |
| 5 | 1 | Dreadnought × 1 |
| 15 | 2 | Tactical Marines × 3 |
| 15 | 4 | Tactical Marines × 3 |
| 15 | 2 | Scout Marines × 1 |
| 15 | 2 | Dreadnought × 1 |
| 15 | 3 | Dreadnought with Assault Cannon × 1 |
| 35 | 3 | Scout Marines × 1 |
| 35 | 4 | Scout Marines × 1 |
| 35 | 2 | Dreadnought × 1 |
| 35 | 4 | Dreadnought × 1 |
| 35 | 1 | Dreadnought with Assault Cannon × 1 |
| 35 | 3 | Dreadnought with Assault Cannon × 1 |
An extremely diffucult wave. The dreads make this wave very hard, the melee variant is somewhat less dangerous as kiting is viable. The assault cannon type is much more dangerous as the sweep attack does knock down and high damage. Cover is extremely helpful on this wave as it cuts down on damage from plasma weapons. Sadly most cover is gone by this point from explosions. Mobility is vital here, once again a farseer is very helpful or the whole team should have some means of rapid redeployment. Any team members without a means of transportation will be taken down early unless they have superior health regeneration and heavy cover. The terminator is a threat with his long range rockits (approx. half map length), they should break any remain cover nicely. Thankfully he can still be focus fired. If the team can knock him out early then alls the better.
Wave 20: Special[]
| Time | Spawn | Unit |
|---|---|---|
| 0 | Center | Chaos Lord |
| 0 | Center | Player 1 clone |
| 0 | Center | Player 2 clone |
| 0 | Center | Player 3 clone |
| 15 | 1 | Bloodletters (2) |
| 15 | 2 | Bloodletters (1) |
| 15 | 3 | Bloodletters (2) |
| 15 | 4 | Bloodletters (1) |
| 45 | 1 | Bloodletters (2) |
| 45 | 2 | Bloodletters (1) |
| 45 | 3 | Bloodletters (2) |
| 45 | 4 | Bloodletters (1) |
| n/a | n/a | Lictor Alpha (1) |
| n/a | n/a | Warboss (1) |
| n/a | n/a | Terminator Marine (1) |
The final wave opens with a cutscene and moving your party outside the arena, in one of the spawn locations. (Note: if your Chaos Sorcerer has a doppelgänger unit, it will be teleported instead, while the Sorcerer is left standing where he was) You then face the Chaos Lord and your clones from wave 16. Additionally, the enemy heroes from waves 17–19 are still lying about, waiting to be revived. There are also 12 squads of Bloodletter daemons coming from all four spawn locations.
It is highly advisable that the team regroup early on (yet again, a Farseer with Group Teleport helps here). As with wave 16, teamwork is vital and every hero fighting on their own in a corner is swift slope to party wipe.
It is advisable to kill the Bloodletters first, as they have high damage and disruption. From there, kill the heroes one by one using a similar strategy to wave 16.
Note that ONLY the clones from wave 16 can resurrect. Killing them first helps hugely; otherwise you tend to just kill the Warboss/Terminator/Lictor over and over. As a rule of thumb, if your team blew through wave 16, you have a fair shot at 20. If 16 was tough, then 20 will be all but impossible with the addition of Bloodletters, previous heroes and a Chaos Lord.
Generally, the order of operations in wave 20 should be:
- Regroup and stay mobile; staying in one spot results in hordes of Bloodletters teleporting to your location and butchering you in melee
- Kill all the Bloodletters (it will take a while for them all to spawn)
- Kill the wave 16 clones
- Kill everyone else
Alternatively, if your team has a high-damage, low-health build (or set up traps in wave 19 and the Chaos Lord's area is littered with mines) you can go for a quick knock out of the wave 16 heroes right off the bat. It takes a moment for the Bloodletters to start spawning, and the wave 17-19 heroes have to be manually revived, so if you're really fast you should be able to take them down early. After that, wave 20 becomes a matter of staying mobile and not screwing up. If this fails, fall back to plan B and focus on the Bloodletters, then the wave 16 heroes.
Again, with a decent use of explosives this wave can easily be trivial. Set many explosives (around 10 has worked before) around the statue very early on in the game when you have spare energy, and 6 explosives approximately 1 inch at far zoom from the statue towards the center of the arena (if you know where the other 3 heroes will spawn, it's much easier as you need only place it at the center). The cutscene has the Chaos Lord cause an explosion when he does his intro speech, will set off the explosives in a chain reaction, killing the Chaos Lord and all clones. The only thing remaining will be the Bloodletters. This plan can easily be ruined by teammates who prematurely set off the explosives.
EDIT: Just got through with this plan and for my instance it seemed not to detonate as it should have strangely. It's still possible to plant the explosives and detonate them but you'd have to be very quick about it if they are not detonated as stated above.
External links[]
- The Last Stand - RelicNews Forums – strategy discussion
- Dawn of War 2: Hero Forge – wargear and ability data